Tis the Season…for Christmas Lights Photos

So, Christmas lights are starting to pop up everywhere. And for the early birds, they’ve been up for a few weeks. It even becomes a holiday tradition to load up the family to ride around and look at Christmas lights at homes or through the town. So what is the best way to capture these very bright and intensive lighting displays? Well like all wonders of the world, Google has the answer. I viewed a couple articles and discovered a few tips.

1. Go at sunset, just before it gets dark. As compared to an hour after sunset, it was much darker and harder to capture the lights. It was also easier to underexpose the photo(make it darker) with some light as compared to lightening the photo at dark. IMG_3048IMG_3101

f/1.8     1/1000th second     ISO 200                                     f/1.8     1/100th second     ISO 400

This photo was taken just after 5 when the sun was setting. But you’d never be able to tell that the sun was out. To capture the second photo, at dark, I had to make a drastic change to the shutter speed and modify the ISO, because it was much darker. And if you ask me, I prefer the one on the left, which is the photo taken during sunset.

2. Experiment with the white balance to create a cool effect. In this case I used tungsten to make the blue in the sky really pop. And this only works if the photos are taken while there is still sunlight. Notice the difference between the tungsten white balance and the auto white balance.

IMG_3093IMG_3089

f/1.8     1/100th second     ISO 400                               f/1.8     1/100th second     ISO 800

There’s something about tungsten photo (left) that really speaks to me. I like it. Now this may not be appropriate in all instances but it really added a nice effect to this photo. Other than the white balance the only thing changed was the ISO. The tungsten white balance added more light so a lower ISO was achievable, which is always desired. ISO of 800 is higher than I like to use anyway.

3. You’re not going to be able to control the background. There will people everywhere or an eclectic variety of lights. Embrace it. Capture a new perspective. There’s no use in fighting it or getting angry. In these photos I embraced the people, variety of lights, and opportunities to create a new perspective.

Check out these photos I took at the town square in Fayetteville, Arkansas on November 29th. The first two photo I was experimenting with the lights and then I obviously became infatuated with a horse’s tail. Go figure.

IMG_3260IMG_3082IMG_3166

   f/1.8     1/100th second     ISO 800  f/1.8     1/100th second     ISO 800 f/1.8     1/100th second     ISO 800

The first photo has a lot of different lights colors combined. The second photo I really love and must admit it was an accident. A tree with multicolored lights was close and this was the result with the lowered aperture.

IMG_3246IMG_3139

  f/1.8     1/100th second     ISO 400                                  f/1.8     1/100th second     ISO 800

Green and red, nothing screams Christmas more than green and red lights! Or it could mean a red light, but you get the idea.

IMG_3244IMG_3055

    f/1.8     1/100th second     ISO 400                                    f/1.8     1/200th second     ISO 400

Notice how these three photos are of the same tree but they are all different. I was kind of obsessed with this tree. The couple walking made a nice addition to the middle photo, too.

IMG_3142IMG_3145IMG_3237

f/1.8     1/100th second     ISO 800 f/1.8     1/100th second     ISO 800 f/1.8     1/100th second     ISO 400

The very uncooperative reindeer that would NOT stand still. And there was horrible lighting and a pesky fence. I truly wish this was a high quality image but I still think it is a cute shot. He kept sticking his tongue out at me and walking away as if he knew what I wanted and wasn’t going to give it to me. And I assumed this was Dasher by the way he was acting.

IMG_3192

f/1.8     1/100th second     ISO 1600

Well, that’s all folks. I hope you’ve enjoyed these blogs. And remember Inspire, Capture, Ignite: Capture all of life’s greatest moments.

After you’ve snapped hundreds of photos of your children (with or without fur) and whatever else captures your interest, select photos most likely need editing – no matter how excellent of a photographer you are. Images should be culled down, too. A client doesn’t want to look through 50 photos that are very similar. Even if you take 300 photos, there will probably only be 15-25 distinguishable, worthy photos. Congratulations, those are the photos you edit. Unfortunately (and fortunately) there is no one way you edit photos, there are multiple ways and the choice is up to you. However, your goal should always be to increase the photo’s beauty without diminishing its quality.

So better than to tell you what do, I’m going to show you what I typically do.

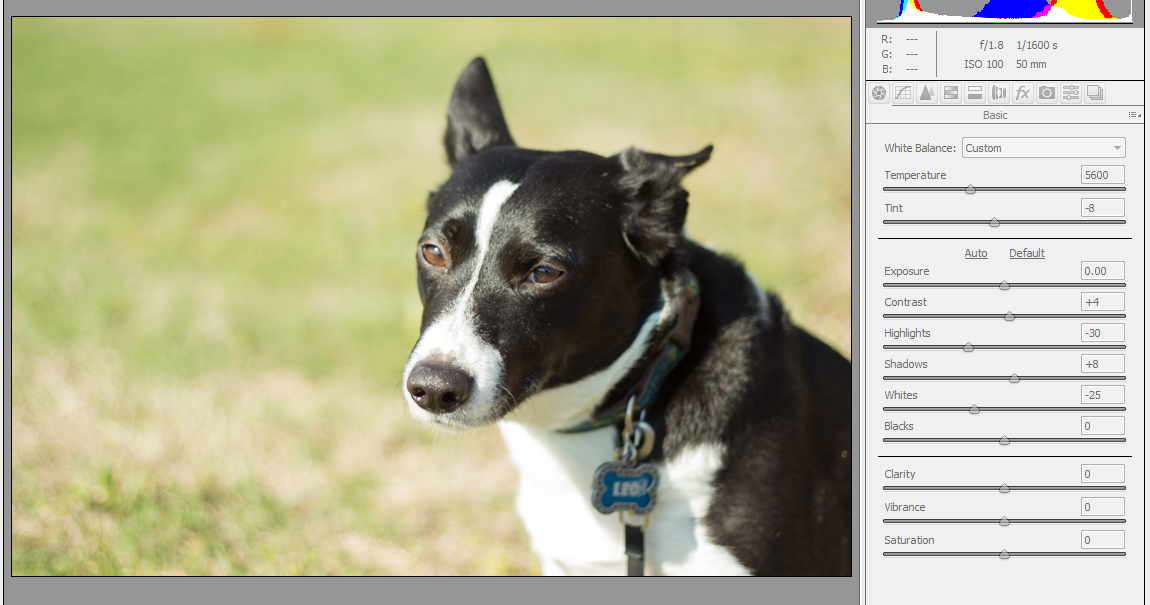
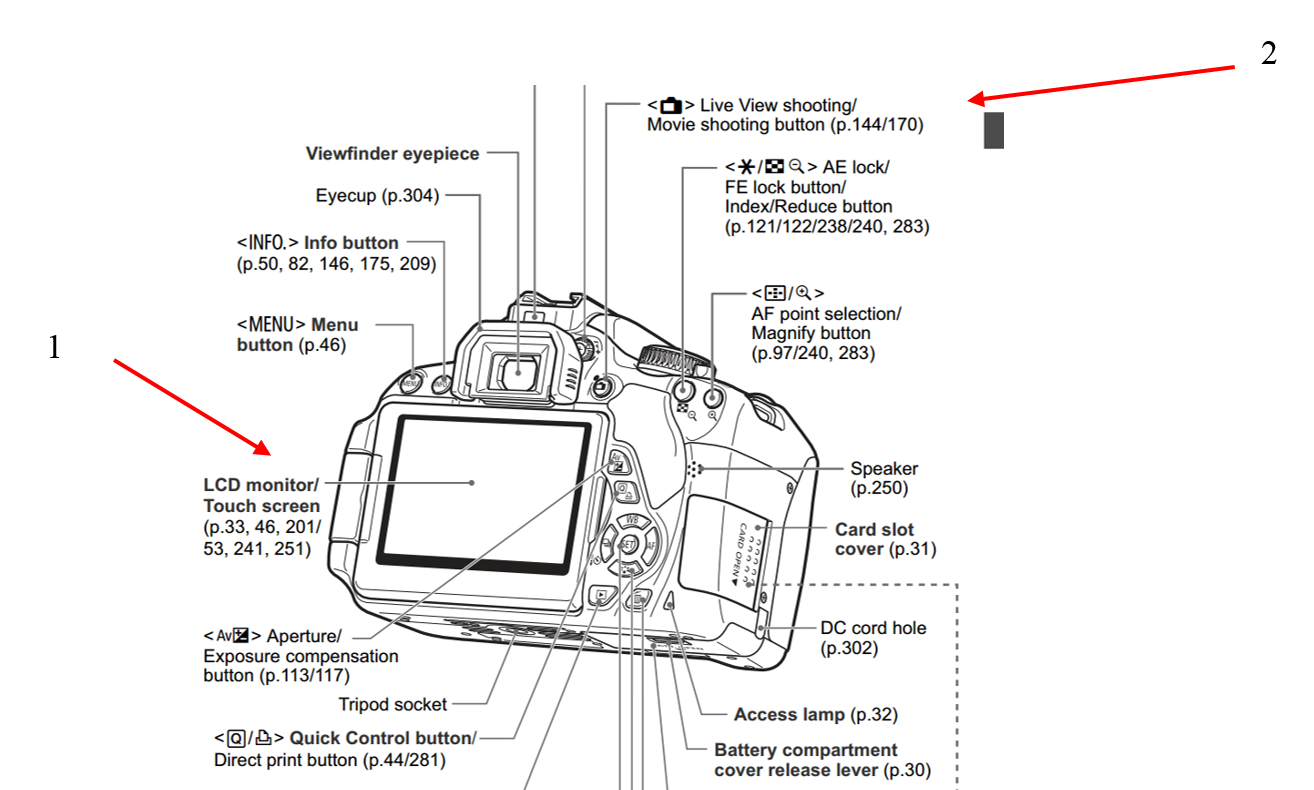
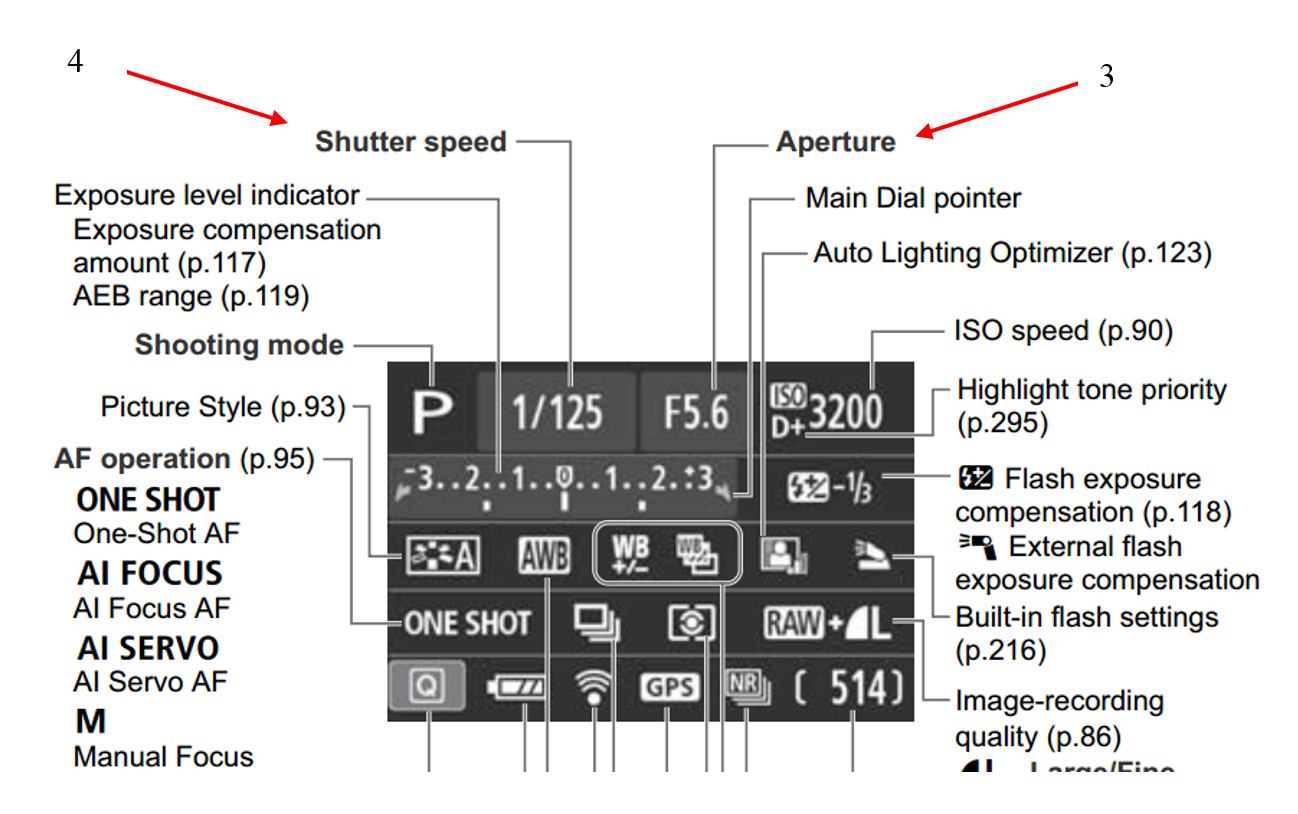
Let’s start with this RAW photo of my uncooperative model, Leo (Yes, I’m kind of obsessed with my dog). As stated in my previous post, this post was taken with my Canon T4i using a 50mm lens(I use this camera and lens for all of my photos) at f/1.8, 1/1600th second shutter speed, and ISO 100. Remember the lower aperture is how I achieved the blurred background.

IMG_0574b

First, open the RAW file in Adobe Photoshop. I will be using the CS6 version. A Canon Raw file extension should read .CR2 (Nikon uses .NEF).

It should look something like this in Photoshop. It’s the RAW editing window. (It’s only grayed out because I was using the snipping tool instead of print screen. I couldn’t get a large enough picture because I have double monitors.)

rawPNG

The first thing I edited was the tint. I moved it down a slight bit on the green side because of the grass in the background.

raw2

I didn’t edit the exposure because I felt the way it was shot was sufficient. If your photo was too dark, you could bring the exposure down or vise versa. Next, I bumped the contrast up a tiny bit to accentuate the dark subject on light background.

raw3

I brought the highlights down (to the grey, negative side), because Leo has a lot of white that is always over exposed in the sun. It gets blinding, like take a picture of Edward Cullen minus the glitter, white (For the record, I’m NOT a twilight fan).

raw4

I reduced the shadows to minimize the shadows on Leo. He wasn’t in the best spot, but unfortunately Leo doesn’t know how to pose on command, like most kids – so you have to take what you can get.

raw5

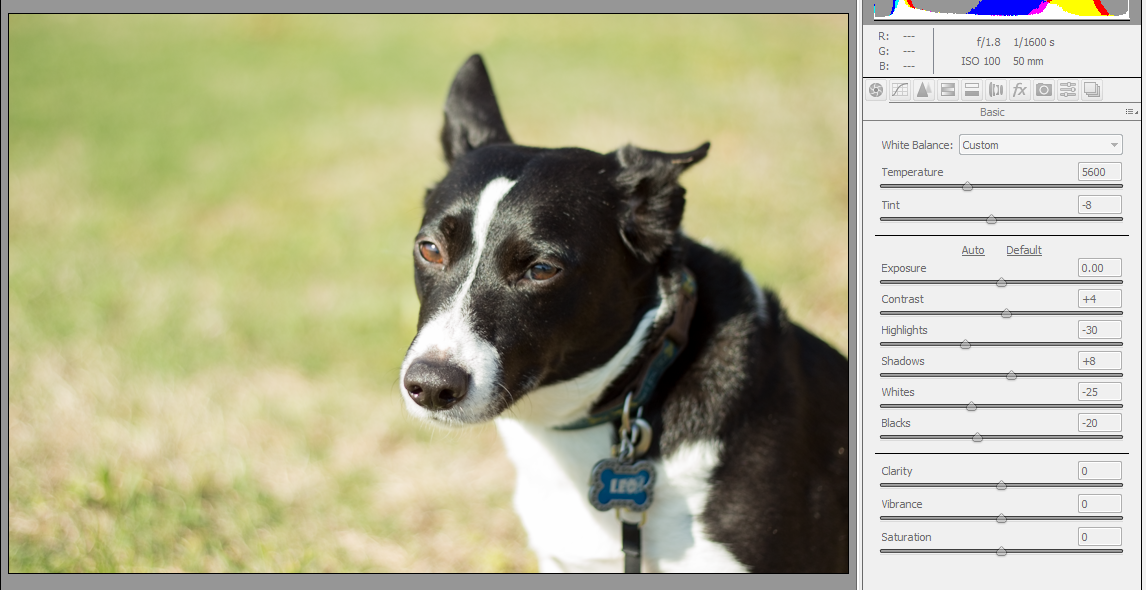
And as mentioned with the highlights, Leo’s white can be reflective. So I always reduce the white on him.

raw6

And increase the blacks.

raw7

And finally, I increase the clarity and vibrance by a smidge.

raw8

Click “open image” and the file will now open in Photoshop. The first step of photo editing is to always copy the background layer. Click the background and drag it to the icon that looks like a folded piece of paper. Or, right click on the background layer and click “duplicate layer”. This way you always maintain the integrity of the original image and have it on file. copybackground

Additional edits can now be made to the photo such as adjusting brightness and contrast, levels, curves, or adding filters. I like to do the majority of my editing in RAW. Most of those steps are used when you edit JPEGs and editing starts directly in Photoshop – as opposed to the gray window with sliders you saw on my screen. Editing RAW photos helps maintain the fidelity of photos as compared to JPEGs. I will make a couple adjustments here though.

I’ll use the dodge (lighten) tool and burn (darken) tool to enhance Leo’s eyes. They’re really quite lovely when the sun shines upon them. They turn from poop brown to a mocha hazel. Select the dodge tool in the tool menu below. It will give you a circle, that is the size of your tool or brush. You want to adjust it accordingly using “[”  and “]” to decrease and increase the size. We want to lighten the iris, or part with color surrounding the pupil.

dodgeeye

Now, you want to use the burn tool to darken the borders around the eye. It’s under the same task group as the dodge tool. You may have to click the arrow in the bottom right corner to find it.

burneye2

So, here’s the before eyes compared to the after.

eyesbeforeeyesafter

Subtle but still a pleasant difference.

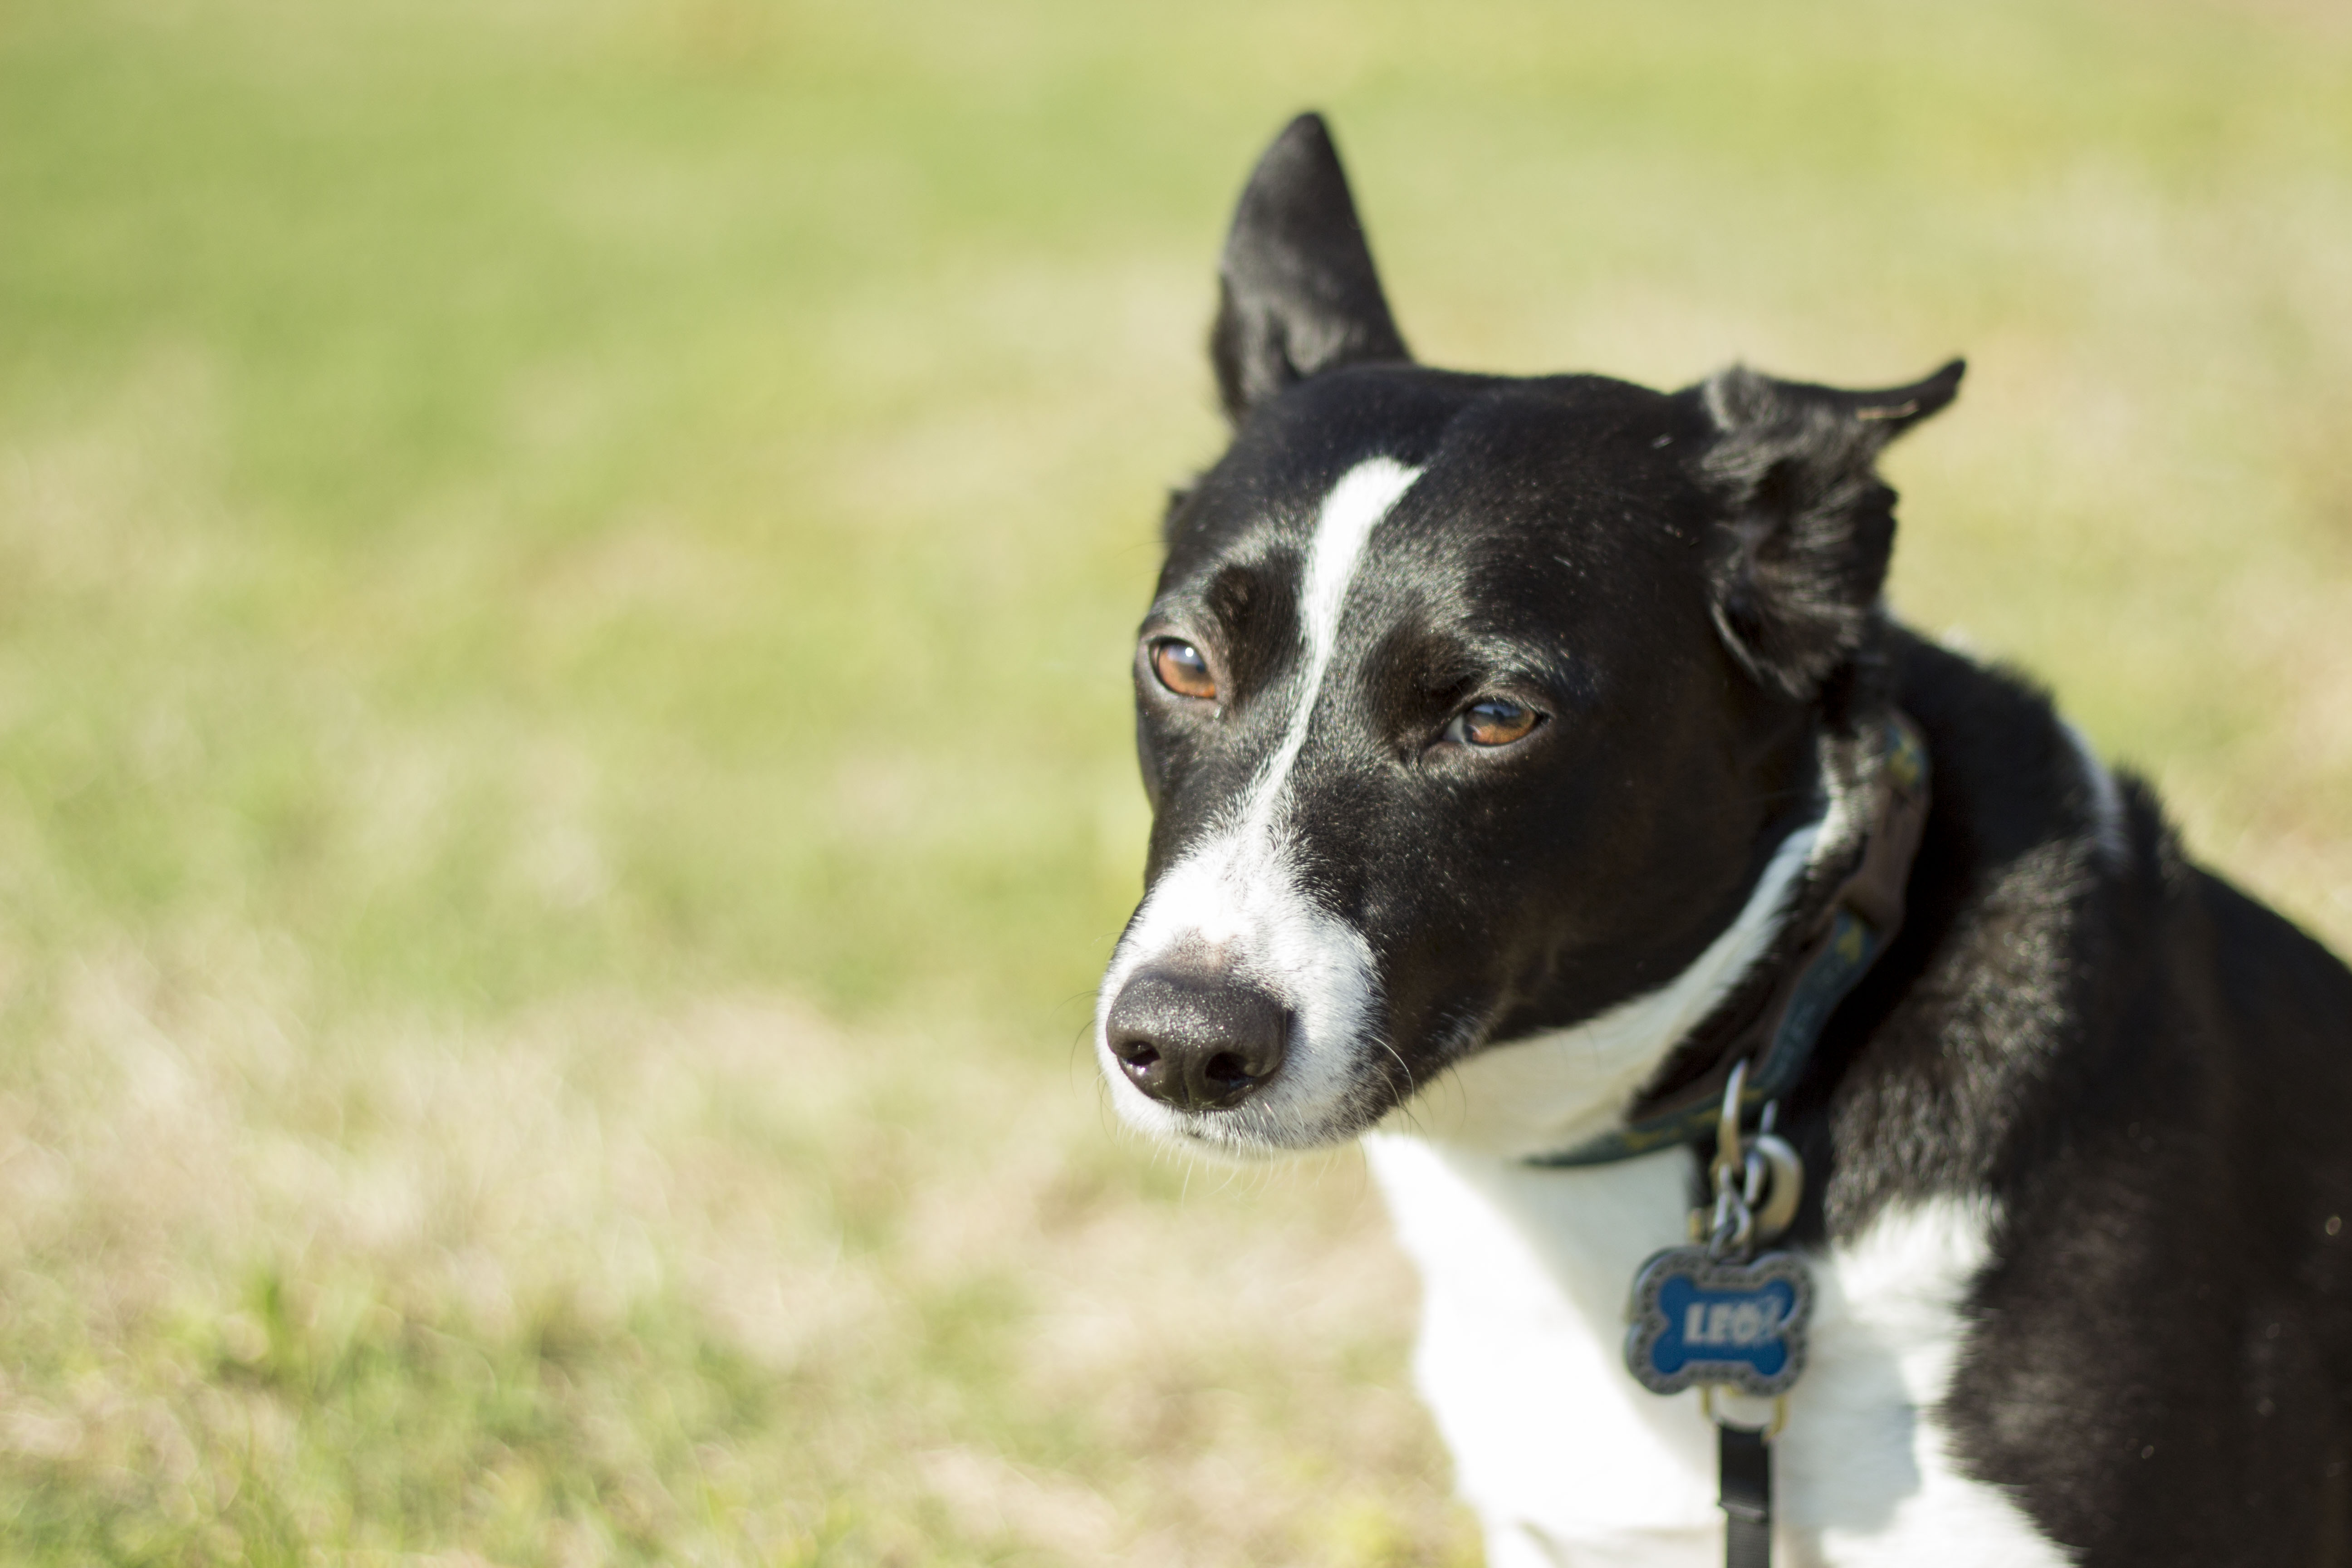
And the overall before photo compared to the photo after editing.

IMG_0574bafter

Voila!

Lastly, always save a Photoshop native file (.psd). Save first and save often. File>Save As>Choose Destination and File Name>PSD

Another consideration for saving is if you want your photo to be in RGB (red green blue) or CMYK (cyan magenta yellow black). RGB is used for posting photos online or viewing on electronic devices such as phones, computers, or tablets. It is the default setting for photos. However, if you are wishing to print your photos, they need to be converted to CMYK. Note: There is a drastic difference when a CMYK photo is viewed on a phone. The green in Leo’s photo would most likely have a neon tint. It’s not pretty. So to convert images by Image>Mode>CMYK. This step should be done after all editing has been completed. It will merge layers, meaning you can’t go back and edit individual layers. So I repeat, do this step last. See the photos below to compare RBG vs. CMYK.

afteraftercmyk

See that neon, radioactive green? Told you so.

You should also save a copy of your image to publish on a computer, have printed, or send to friends. Photoshop files are very large and can’t be read by many programs or viewed by people who don’t have Photoshop. Saving as a JPEG is good for saving a photo intended to be uploading to Facebook, your blog, or other electronic media outlet. Just choose File>Save As>JPEG. However if you wish to print photos at high quality (remember they should also be CMYK), you’ll need to save the photo as a .TIFF. Choose File>Save As>.TIFF. These photos are used to maintain image fidelity.

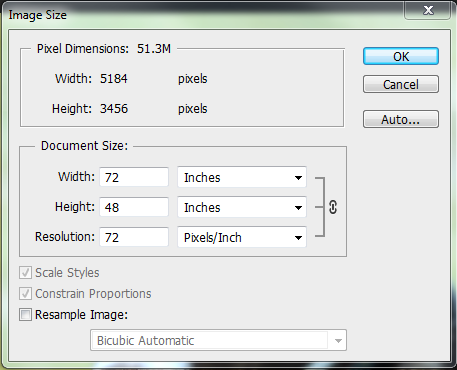
Lastly, image resolution is a huge considering in how to save and utilize images. JPEG images uploaded to the internet should be 72 ppi (pixels per inch). The internet requires smaller images for downloading and uploading so they can have a lower resolution as compared to print photos that should be 300 pp. As mentioned previously, photos intended for printing need to be the highest quality possible. To change or view the image resolution, go to Image>Image Size. The photo, because it was taken with a DSLR and not downloaded from the internet, is already 300 ppi. Notice it’s size of 17.28 x 11.52 inches. When I change the photo to 72 pp1, the image size changes drastically. It’s now 72 x 48 inches. Why?

72PNG 300

Because the photo has a lower resolution it can be increased in size (as high as 72×48) without losing image quality. The 300 ppi photos require more photos and must be kept at a smaller size. If you increase the photo’s size to larger than these constraints, the photo will become pixelated. You’ll be able to see the tiny square that make up a photo, kinda like those old school Mario video games and others.

All in all, be sure to save and adjust your photo according to the intentions. Photos for personal or web use should be RGB at 72 pp1. Photos to be printed should be CMYK at 300 ppi. Regardless of the use, you should always save the native .psd file and a .jpeg copy for your records.

Here are some other photos I have edited just for you. Enjoy.

IMG_1051IMG_1045IMG_0582IMG_0583IMG_05841401718_10201477469791683_1834192036_oIMG_1009IMG_0738IMG_0765 copy

Like I said, I’m obsessed with my dog. Don’t hate. I did include a human (my dear designer friend, Amanda) and a tractor. I might be normal after all.

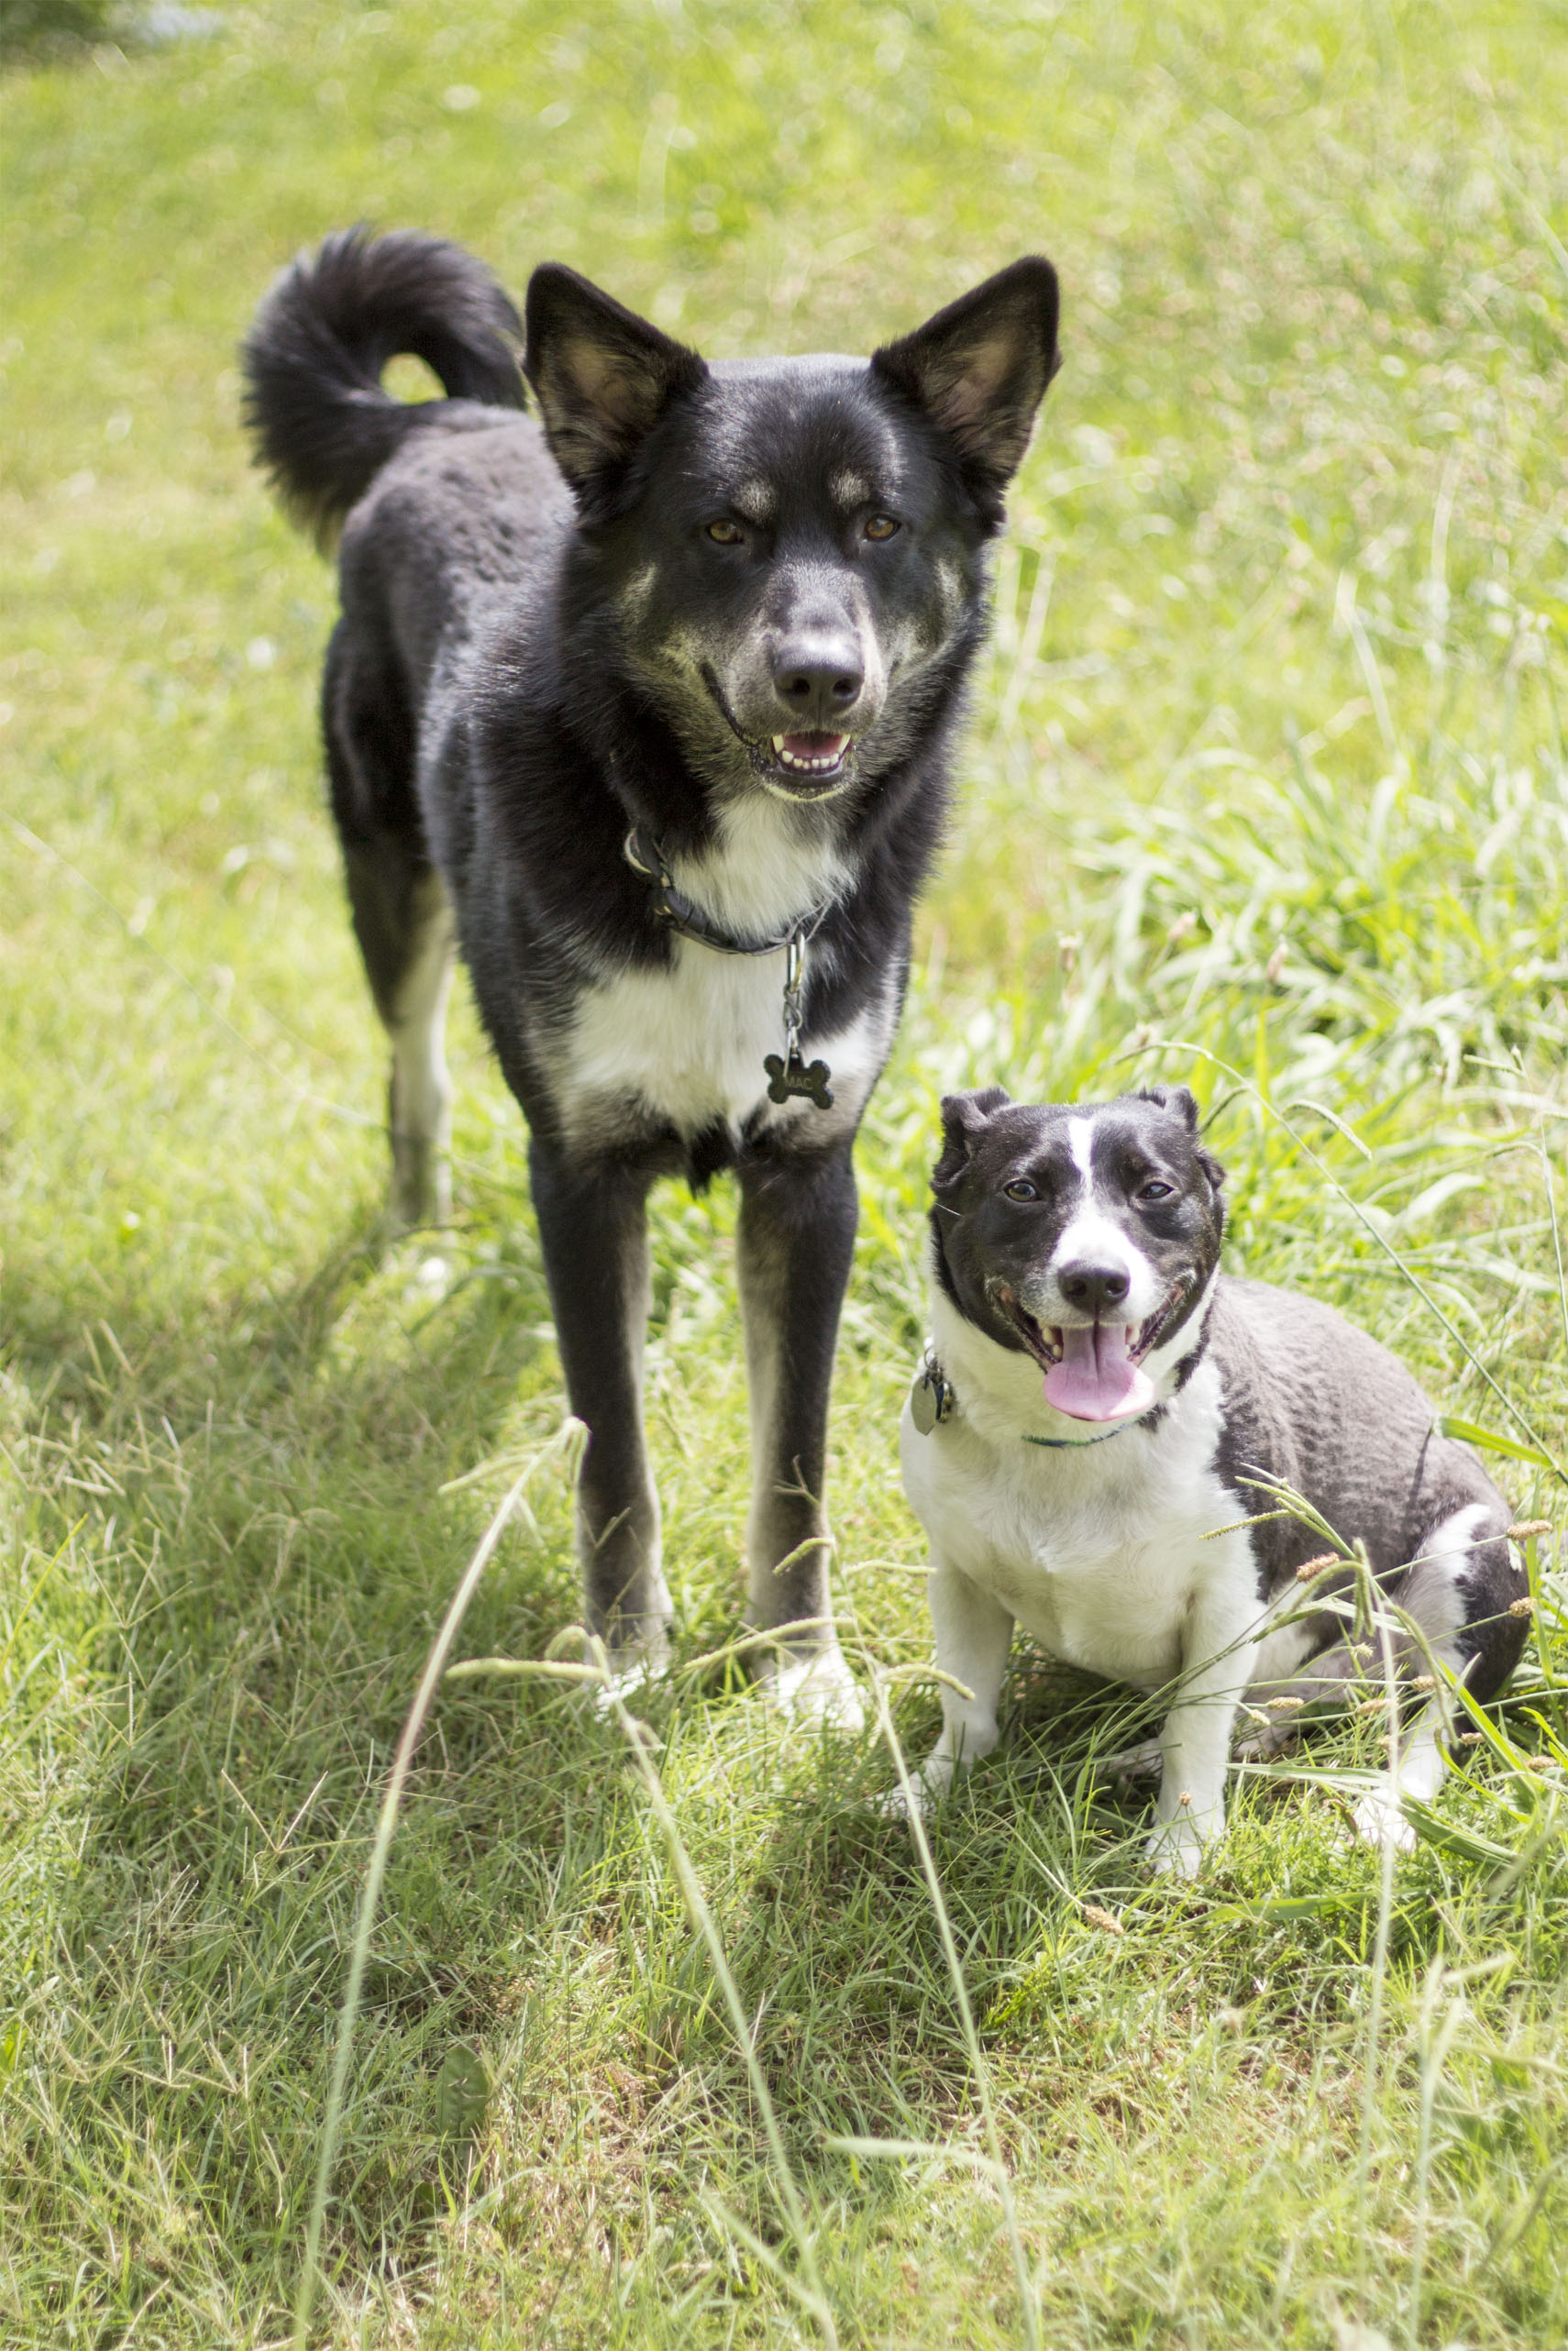
Photo 1 – Mac taken in his owner’s backyard in Fayetteville, Arkansas on June 30th. f/1.8     1/4000th second     ISO 100

Photo 2 – Leo & Mac taken in Fayetteville on June 30th (Yes, I know Leo is Edward Cullen white, but this photo is absolutely adorable. I should have increased the shutter speed or decreased the ISO. Maybe both.). f/1.8     1/3200th second     ISO 200

Photo 3 – Leo taken at my apartment in Fayetteville, Arkansas on April 29th. f/1.8     1/1600th second     ISO 100

Photo 4 – Leo taken at my apartment in Fayetteville on April 29th. f/1.8     1/1600th second     ISO 100

Photo 5 – Leo taken at my apartment in Fayetteville on April 29th. f/1.8     1/1600th second     ISO 100

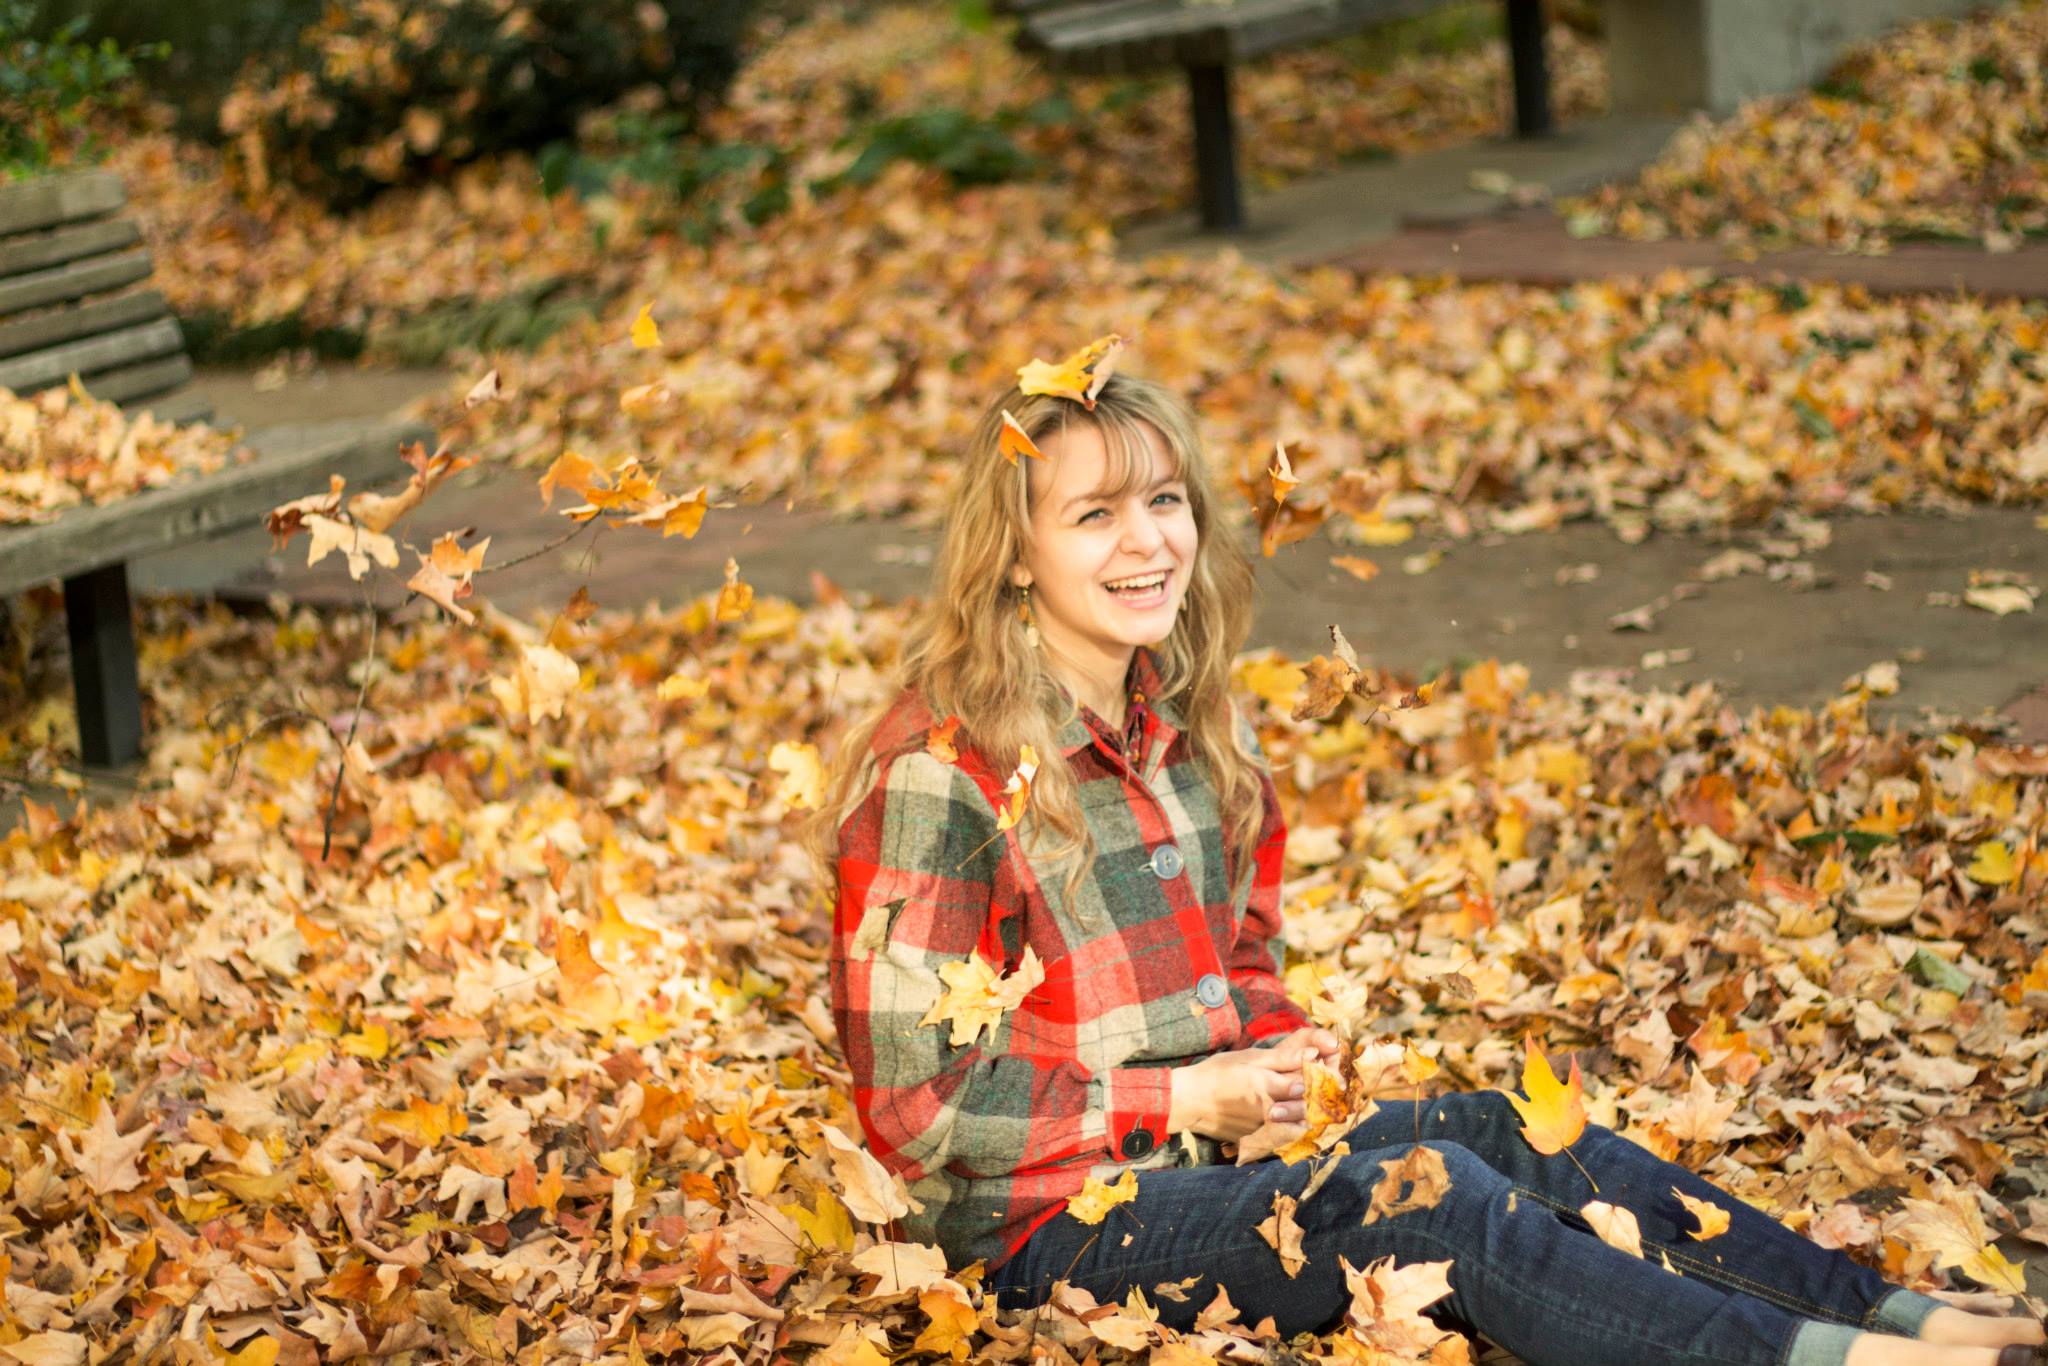
Photo 6 – My friend and colleague, Amanda Northfell at the University of Arkansas on November 19th. f/1.8     1/4000th second     ISO 200

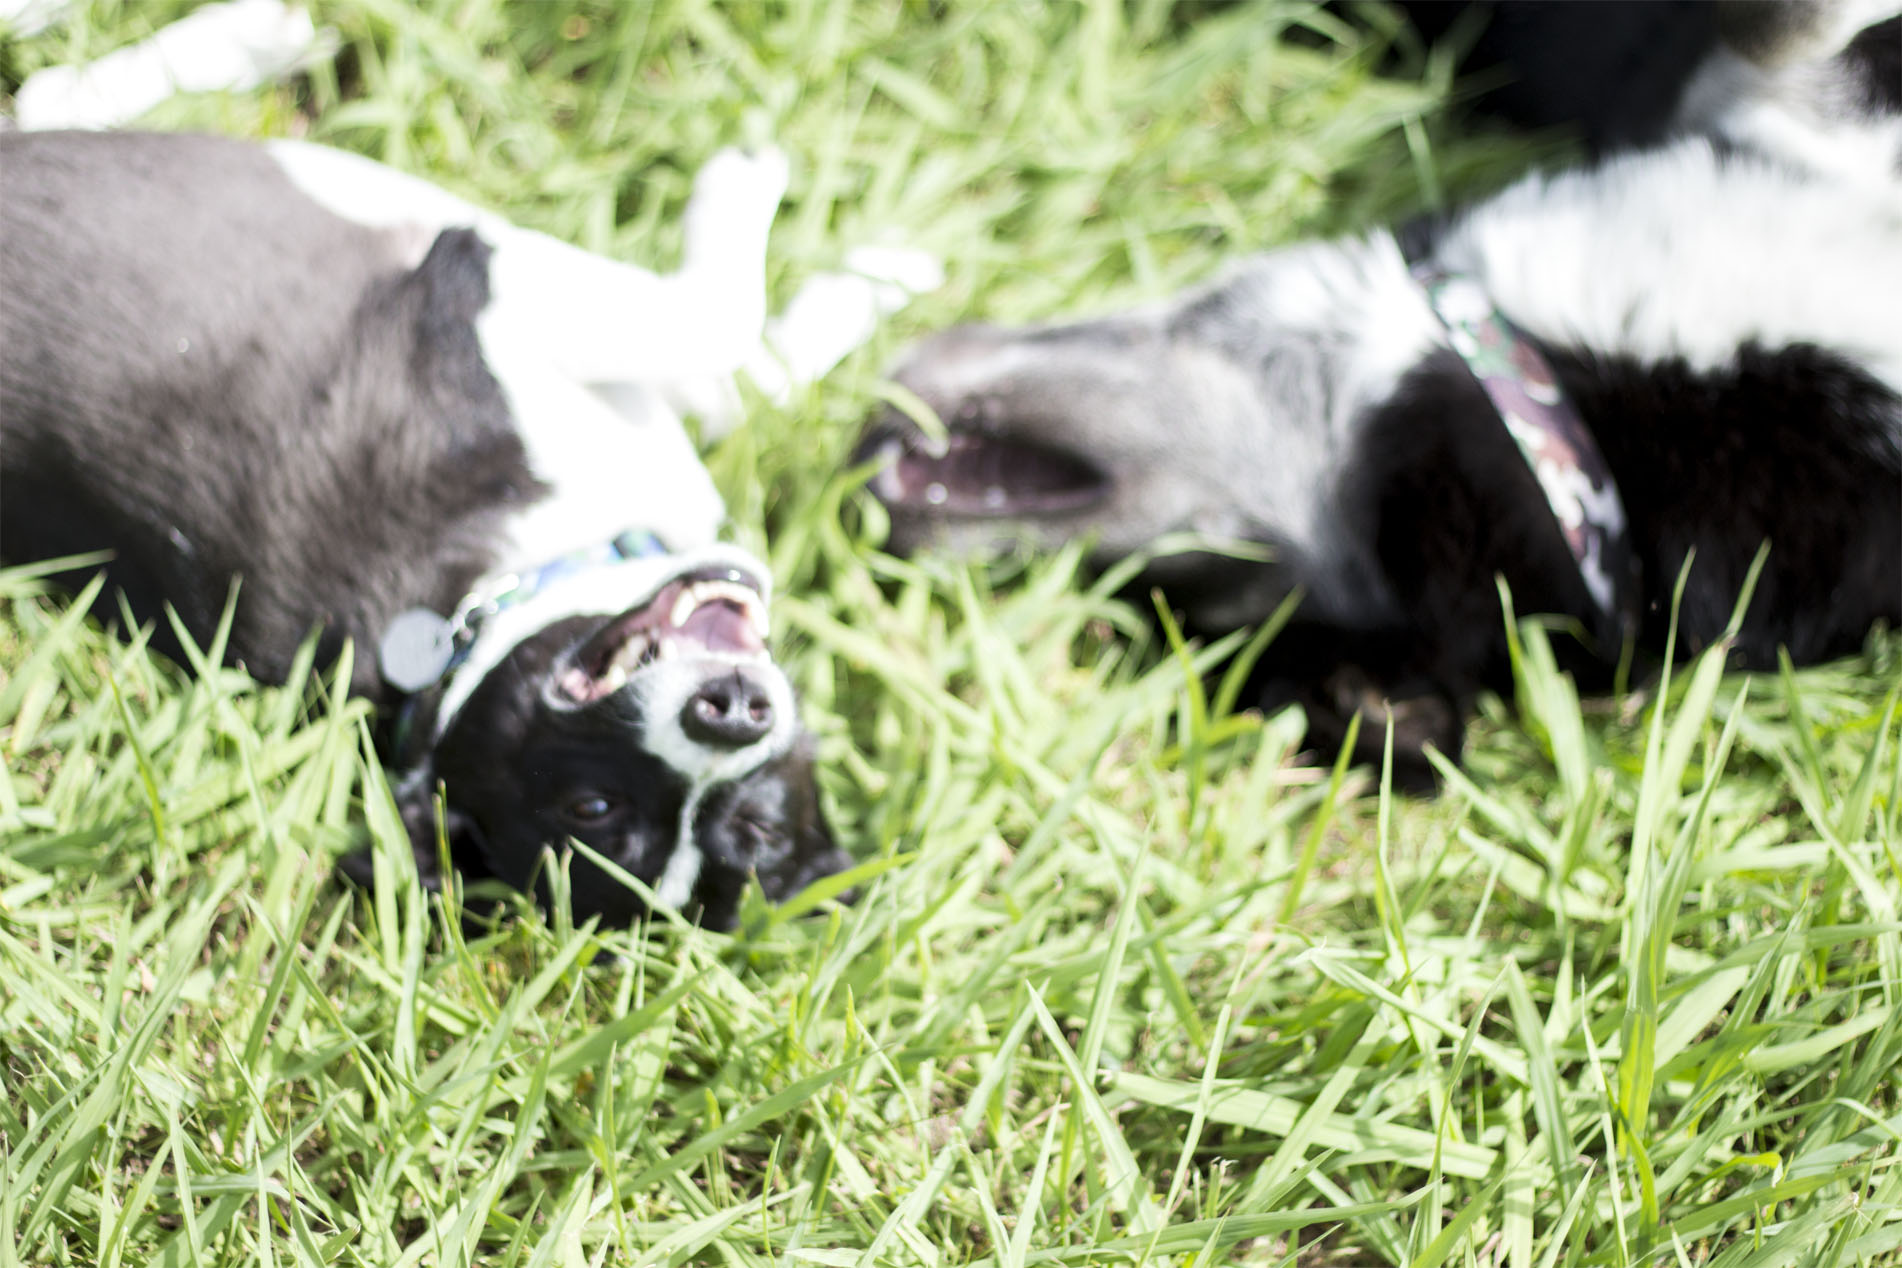
Photo 7 – Leo & Mac again on June 30th (Shadows are horrible, but you can’t be picky with photographing your pets.It’s about capturing a moment, not a pose.) f/1.8     1/3200th second     ISO 200

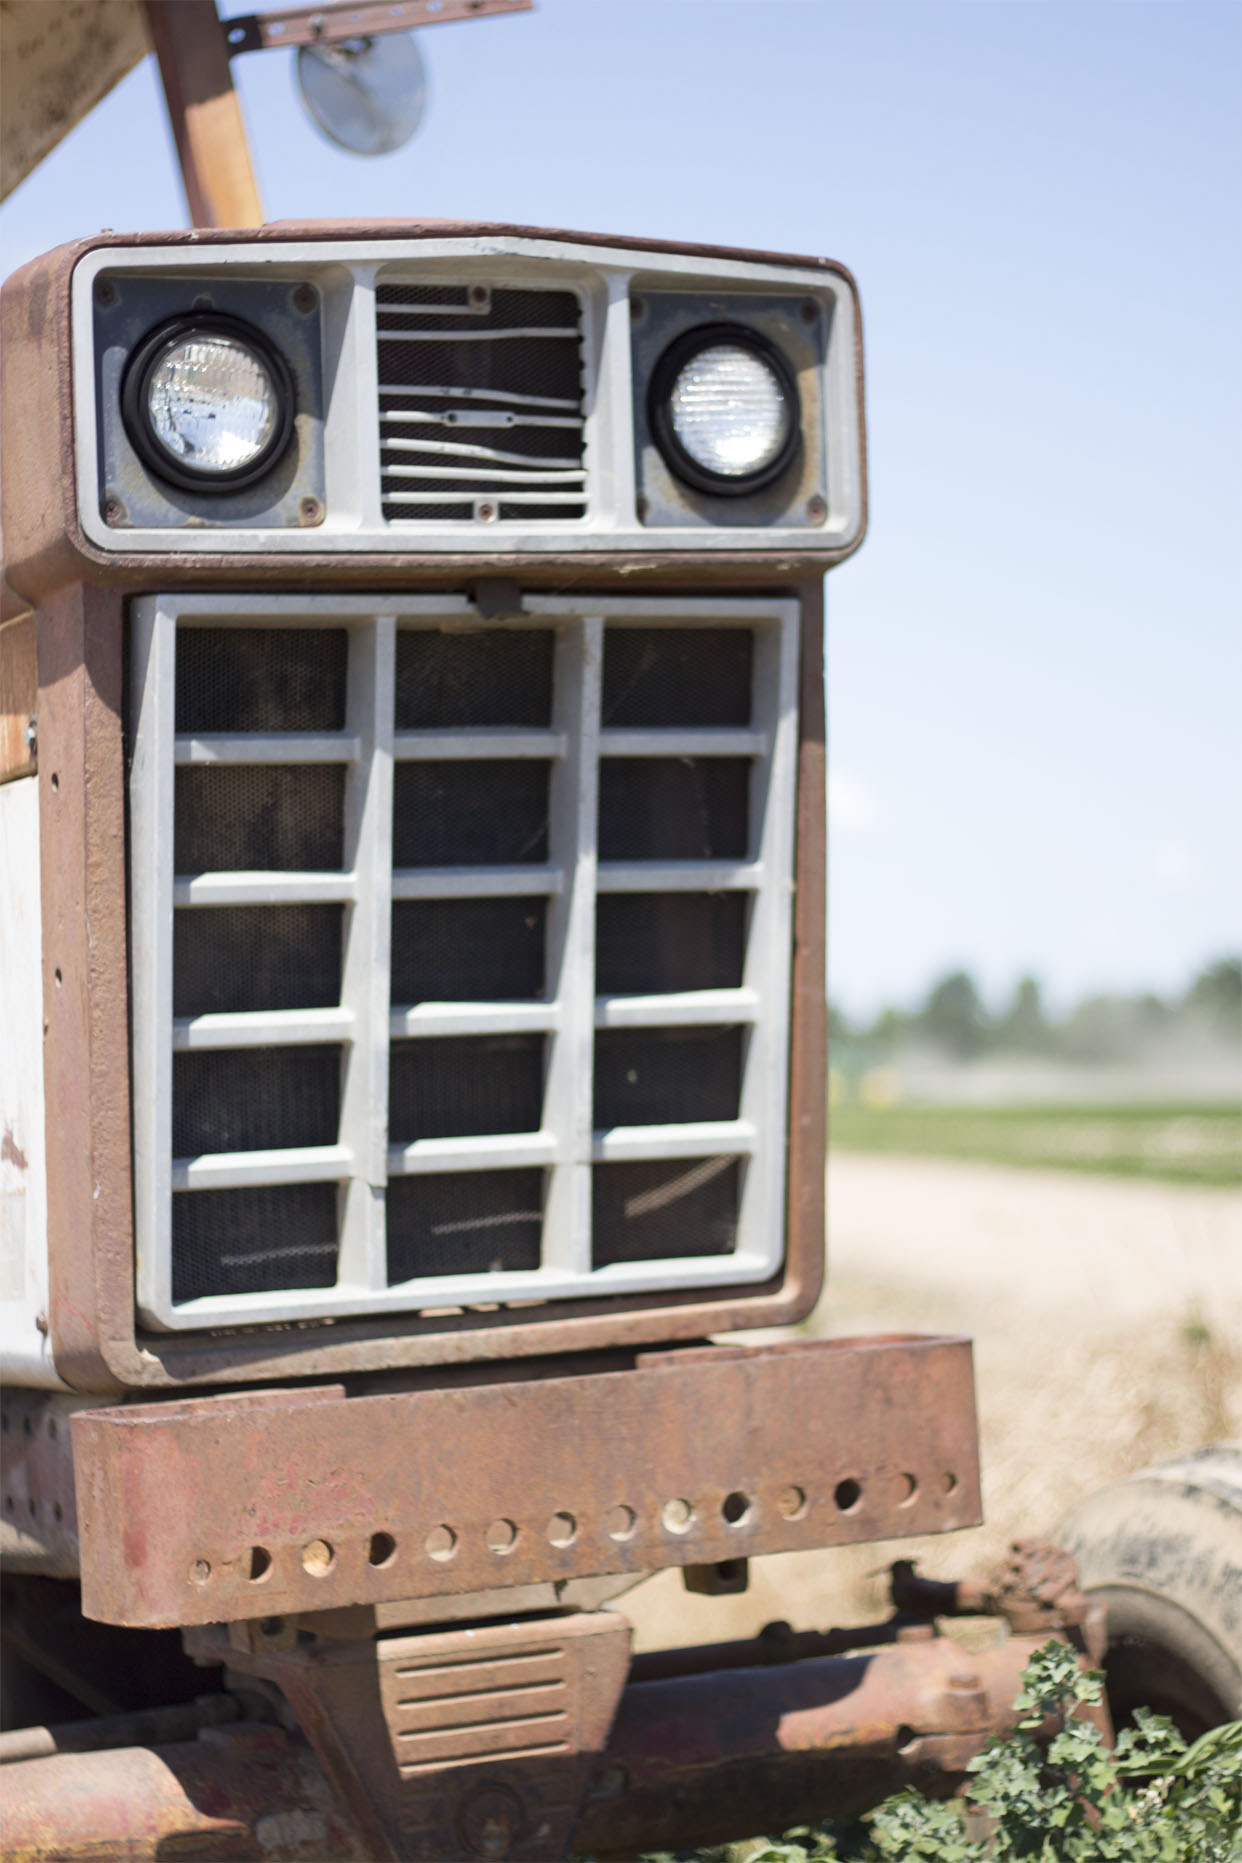
Photo 8 – An antique tractor taken on Shannon Davis’ farm in Bono, Arkansas on June 28th. f/1.8     1/2500th second     ISO 100

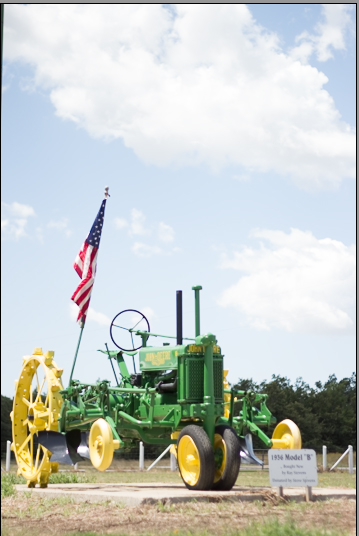
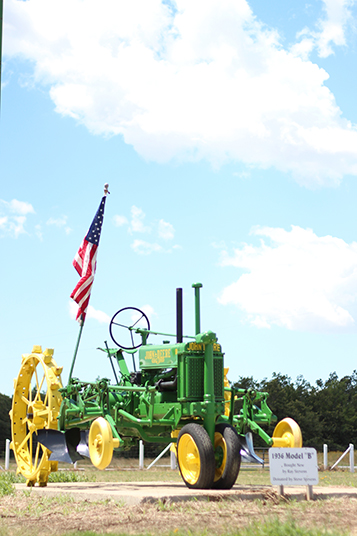
Photo 9 – Another antique tractor taken in Bono on June 28th. f/1.8     1/4000th second     ISO 100

Taking Photos in Manual Mode

Before you read this blog and experiment with the settings, check out my friend Carley Calico’s blog on photo composition. While settings are a big part of creating a beautiful photograph, composition plays a major role, too.

Ok, so there are three main features to master for beginner photography in manual. I stress beginner because I know the pros are snickering at this statement. Regardless, these three features will give you the skills to capture beautiful photos in manual mode. So when you say, “Yeah, I took that. No big deal” you can brush your shoulders off, too, because you did take the photo without relying on your camera. Go on, *brush your shoulders off*.

The three features are:

  • ISO
  • Shutter Speed
  • Aperture

You’ll notice a trend in these features – light. Each settings can affect how much light your camera absorbs which can affect exposure. Too much light and a photo can be overexposed where as too much little can result in an underexposed photo. It’s a tricky situation to balance the three amigos, but once you start adjusting the settings frequently, you’ll learn which is the right one to adjust and how much.

ISO is the sensitivity of an image sensor. A lower ISO means a lower sensitivity to light. However, the photo is also less grainy. Higher ISOs can be used in darker lighting situations, but with a higher ISO comes more “noise”. The photo develops a grainy shot as compared to a crisp shot. My Canon t4i’s ISO ranges from 100-12800, which is a ridiculously high number in my opinion. I personally never go above 400 to maintain image quality. So don’t over adjust the ISO, got it. What’s next?

Think back to a previous post. Shutter speed is the time that the camera shutter is open to capture the picture. This camera’s shutter can be as little 1/4000th of a second to capture moments such as in sports. Lower shutter speeds would be used to capture the entire motion such as, light streaks at night.

Now you’re probably thinking – So what? Well this means that higher shutter speeds let in less light (because the shutter is open for a shorter time period) and vice versa. Ok, so on cloudy days/dim lighting I need a lower shutter speed, got it. Not exactly. Shutter speed is also needed to capture movement. So if any subjects are going to be moving (and if you’re like me and only take photos of your dogs that can’t sit still), you need a relatively fast shutter speed. So how do I correct lighting issues now?

Aperture is the degree to which the lens is open that effects the amount of light let in by the camera. A lower aperture actually means a larger opening allowing more light whereas a higher aperture results in a smaller opening with less light. This is probably my favorite feature. My Canon EF 50mm f/1.8 handles this like a dream. It’s quite the bundle for your money.

It also enables the camera to adjust the depth of field. This means that parts of the background is not in focus, or blurred out. That way the focus is only on the main subject and viewer is not distracted by the background. It is also a casual photographer’s best friend when photographing candid shots children (or fur children for me) at home without worrying about the laundry or dishes in the background. Thank god no one can see how far behind I am. Phew.

Here is a graphical representation of all the mumbo-jumbo above.

whichcanoncamera

So let’s see how this process works. Warning: This can be a long and tedious process. A lot of people choose automatic because it is much easier. You can adjust manual settings for when you’re facing away from the sun, but guess what – when your turn…you guessed it, you must change the settings again. If it’s so much work then why does anyone choose manual? It’s simple. Manual gives the photographer a sense of accomplishment and pride. You captured that glorious photo not the camera, you chose the correct settings, you are the reason the photo is admired by all. And I feel like I should state for the record that in no way, shape, form, or fashion am I labeling myself as a “professional photographer”. I have no aspirations to turn this hobby into a career. I prefer to capture life in action rather than creating photo shoots, and that is my goal for photography skills. So this is typically what happens when I start to adjust settings…

Image

f1.8            ISO 400            1/500th/second

Holy krap, that photo is blinding. Too. Much. Light.

Image

f1.8               ISO 400                  1/2000th/second

Better but still too much.

Image

f1.8              ISO 400                   1/4000th/second

Getting closer.

Image

f1.8              ISO 200             1/4000th/second

Finally.

Now as you may have noticed, aperture stayed the same throughout that process. Well I have my reasons. I’m really digging the utilization of depth of field right now so I love to keep a low aperture. Also, aperture lets in natural light, as opposed to ISO, and I try to keep a generally fast shutter speed to account for for my inability to hold a camera still. And I’m generally taking photos of dogs running, which requires a fast shutter speed.

So hopefully this has helped you learn a little more about adjusting settings to capture stunning photos. Just remember as I stated and demonstrated, this is a tedious and sometimes annoying process so hang in there. It’s rewarding in the end. Go forth young grasshopper and capture all of life’s greatest moments.

Here are a few examples of my life’s favorite moments. Hopefully they can ignite your passion for photography. These photos were uploaded from a raw format and no editing adjustments have been made yet.

IMG_0574b

These photos are of my dog, Leo, and were taken at my apartment on April, 29th.

f/1.8     1/1600     100

IMG_0582

f/1.8     1/1600     100

IMG_0584

f/1.8     1/1600     100

IMG_0738

This photo is of an antique tractor on Shannon Davis’ farm in Bono, AR on June 28th.

f/1.8     1/2500     100

IMG_1009

This photo is of Leo and Mac, my boyfriend’s dog. It was taken at my boyfriend’s house on June 30th.

f/1.8     1/4000     200

IMG_1045

 Mac & Leo again. Leo may be super washed out but I absolutely love this photo.

f/1.8     1/3200     200

IMG_1051

This is Mac again taken at my boyfriend’s house. Isn’t he majestic?

f/1.8     1/3200     200

RAW vs. JPEG

So along with the Canon vs. Nikon (*cough* Team Canon!) there is the RAW vs. JPEG battle, too.  Really they are just two different image formats produced by the camera. And you’ll eventually ask yourself, “Which one do I Choose?”. Check out this list courtesy of Digital Photography School for the technical aspects of each format.

A RAW file is:

  • Not an image file (special software if normally required to view the file)
  • Uncompressed (large files)
  • Complete (lossless) data from the camera’s sensor (The camera retains as much of the original data as possible)
  • Higher in dynamic range (ability to display highlights and shadows)
  • Lower contrast (flat, washed-out look)
  • Not as sharp
  • Requires post-processing before printing
  • Read only (changes cannot be saved to RAW file)

A JPEG file is:

  • Standard, readable format
  • Compressed file
  • Lower in dynamic range
  • Higher in contrast
  • Sharper
  • Suitable for immediate printing, sharing, or posting
  • Requires less correction
  • Able to be edited (data is lost each time an edit is made)

Notice the difference between these two photos taken with a 50 mm lens at 100 ISO, 1/4000th shutter speed, and 1.8 aperture.

ImageImage

                                              RAW                                                                                    JPEG

Ok, so what does all that mumbo-jumbo mean? Well, it means that RAW format will be the truest form of the image. It will also be a much larger file (normally 2-3x larger) and will require additional editing before it can be shared with anyone. A JPEG is a much smaller file that does not require any processing before it can be shared. Edits can be made, but is not a necessity to view the photo as it is with a RAW format.

So which one do I use? Well, that depends (another one of those answers, really?!) I can’t tell you which one to use. The choice is up to you. However, I can provide instances where one format would be better to use than the other. If you are only going to upload the photos to facebook or keep for personal records, use JPEGs. They take us less space and require less editing. If you plan to edit your photos in any way or publish them, use RAW. They allow for a truer image to be produced and edited without altering the image permanently. Also, when you shoot in RAW, the camera decides the color values as compared to shooting in JPEG, when the computer decides the color value. Or in other words, would you ask the department store about Sam Edelman’s latest shoe line or would you ask Sam Edelman himself? Sam Edelman, of course! You always go to the source. Your camera is always, always going to produce a more accurate interpretation of the photo than the computer, because your camera created the photo.

Still can’t decide? Shoot in both formats. Your camera will allow you to store a RAW and JPEG file of the same photo. Warning: This requires a massive amount of space to store both on your memory card/camera. Personally, I started shooting in both formats so I could learn the difference between the two. And it just provides an easier adjustment than switching to one completely. Now I have transitioned to RAW only and can see the benefits.

And the camera I chose is…

The beloved & beautiful Canon Rebel T4i

Image

“Canon is proud to introduce its most sophisticated Rebel ever [before the T5i was released even though they’re almost identical]—the EOS Rebel T4i DSLR! Built to make advanced photography simple and fun, the new Rebel T4i delivers phenomenal image quality, high performance, and fast, intuitive operation. This EOS Rebel amps up the speed with the powerful DIGIC 5 Image Processor that helps make high-speed continuous shooting of up to 5.0 fps possible—great for capturing fast action. An 18.0 Megapixel CMOS sensor ensures that every image is shot in superb, high resolution; and an extended ISO range of 100-12800 gives photographers the opportunities to take the Rebel T4i into more shooting situations than ever before. A 9-point all cross-type AF system (including a high-precision dual cross f/2.8 center point) delivers improved autofocus performance, and a new Hybrid CMOS AF System increases autofocus speed when shooting photos and video in Live View. For users interested in creating impressive videos, the Rebel T4i is ready to help you create your next masterpiece. Movie Servo AF provides continuous focus of moving subjects, so you never miss a moment. A built-in stereo microphone and manual audio level adjustment helps ensure that your audio will match the stunning quality of your video. First ever for an EOS Rebel, the Rebel T4i features a Vari-angle Touch Screen 3.0-inch Clear View LCD monitor II, which allows fast and intuitive camera operation. Add compatibility with Canon’s proven EF and EF-S lenses and a slew of EOS accessories, the Rebel T4i is an incredibly versatile tool for creating the images and videos you envision (Canon).”

That’s right, touchscreen! You can pinch and scroll just like your iPhone or iPad. It is by far my feature about my camera. I was slightly worried at first because this was the first model with that feature and normally that means a lot of bugs. So far, it has operated seamlessly (and yes, I just knocked on wood or at least I think my desk is made of wood – close enough).

There are several other cool features concerning DSLRs and this particular camera including:

  1. The screen is a rotating/tilt screen (see above picture). You can pull the screen out and rotate it up to 180 degrees to achieve the perfect selfie – no duck faces please. This feature also allows for the screen to face inward when the camera is not in use to prevent damage.
  2. The screen can also function in live mode (meaning you do not have to look through the viewfinder). While this feature is not the most accurate, it is good for beginners and people adjusting from point and shoot cameras, which share this feature. You simply push a button on the back of the camera (next to the viewfinder) to switch bath and forth between this mode. Is there anything this screen can’t do?
  3. Aperture is the degree to which the lens is open that effects the amount of light let in by the camera. A lower aperture actually means a larger opening allowing more light whereas a higher aperture results in a smaller opening with less light. This feature can be accessed through the main menu. It also enables the camera to adjust the depth of field or blur out parts of the background that are not in focus (so that’s how all those pictures on Pinterest were taken).
  4. Shutter speed is the time that the camera shutter is open to capture the picture. This camera’s shutter can be as little 1/4000th of a second to capture moments such as in sports. Lower shutter speeds would be used to capture the entire motion such as, light streaks at night. The shutter speed is adjustable from the menu on the back of the camera.
  5. The mode dial dictates which settings you can control and which ones the camera controls. The settings range from A+ (auto) mode meaning the camera is in complete control to M (manual) where the user is in control. There are also modes that are designed to adapt to certain instances such as landscape, portrait, night, or sport. A new mode, HDR (High-Dynamic Range), has been added to the T4i model. In this mode, the camera takes 3 pictures; one over exposed, one normal, and one underexposed are taken, and then certain elements of each picture are combined to create one composite image.

Image

Image

Image

For more information, check out this review from CNET.

Click here for a full list of the specifications.

Click here to view the entire Canon t4i manual electronically.

Photos courtesy of Canon.

Canon vs. Nikon

Image

Photo courtesy of Peta Pixel

Canon VS. Nikon: Which Camera Should You Charge to the Card?


If you’re considering buying a new DSLR camera, the first choice to make is which brand to choose. When it comes to DSLRS there are two obvious frontrunners that dominate 90% of the market: Canon and Nikon. Both companies produce quality cameras but the teams are clearly defined with consumers and professionals.  Yes, there are other companies that produce quality cameras, but for this article I will only be comparing the top two market defenders. I mean you wouldn’t consider a movie pretzel if you had the option to get nachos or popcorn. At the end of this article, I will tell you which brand I prefer, but until then I will try to keep my loyalty a secret. (*cough* Team Nachos!)


Check out this list provided by Improve Photography for the advantages of Canon and Nikon DSLR cameras. Arrreeeee yoooouuu reeeaddddyyy to SHUTTER?! (Ok, that was a little corny – my apologies.)


Advantages of Canon

  • Video – Canon has trumped Nikon in terms of video performance over the past years.  Nikon lags far behind Canon (1080p and more frame rates) in this aspect.  
  • Price – Nikon cameras and lenses are often slightly more expensive than Canon.  Nikons generally cost approximately 8% than the comparable Canon gear.
  • Megapixel Count – Some photographers don’t care about this, but it is handy to be able to crop in tight with more megapixels (it is more important to professionals or if you wish to print photos on a very large scale).  Canons have outperformed Nikons in terms of pixel count for a few years now.
  • Availability – When Canon announces a new camera, you can generally expect to get it in your hands within a short period of time.  When Nikon announces a new camera or lens (especially higher-end gear), it considerably longer (4 to 6 months).
  • Focus motors – All modern Canon lenses have built-in focus motors including the entry-level models which is only present in the high-end Nikon models.


Advantages of Nikon

  • Low-Light Performance – Over the past two years, most people would agree that Nikon has generally set the mark with superior low-light cameras.
  • Number of autofocus points – Some have argued that Nikons have more autofocus points than their Canon equivalents.  A low number of autofocus points on Canon cameras means there isn’t an autofocus point for where you want to focus in the frame, forcing the photographer to focus and then recompose.
  • Flash Control – Nikon has had better built-in options for controlling off-camera flash for years.  Canon is bridging the gap with its new built-in flash triggers in the newer models.
  • Larger APS-C sensors Nikon uses slightly larger sensors in their crop sensor DSLR cameras.  You can read about the difference between crop and full frame cameras here.
  • Availability of minor features – Nikon has geotagging via GPS in the camera and expanded auto-exposure-bracketing sequences.  

Ding! Ding! Ding!


This round goes to: no one. It proves the biggest point that supporters have argued since the beginning: it’s all about user preference. There is no clear front-runner. Each brand has advantages over the other, but geotagging your photos may not be an interest of yours so why use it to form your decision? Yeah, it’s a cool feature, but would you ever use it? Example: Do you need a fork that automatically twirls your spaghetti?


So which brand did I choose?


Check out my next post to find out!


Inspire. Capture. Ignite.: How to capture all of life’s greatest moments.

For the next few months, I will cover the following photography topics:

*      DSLR cameras

  • Understand the differences between DSLR and point and shoot cameras
    • Define DSLR
    • List strengths and weaknesses of DSLR
    • Define point and shoot
    • List strengths and weaknesses of point and shoot
  • Determining the right camera for your needs
    • Understanding the determining factors of choosing a camera
    • Compare the top two brands: Canon vs. Nikon
    • State my camera choice and its feature

*       Manual vs. Automatic

  • Understand the differences between manual and automatic mode.
    • Define manual mode
    • Define automatic mode
    • Determine and define the settings necessary to photograph in manual mode.
      • Understand how aperture affects photographs
      • Understand how shutter speed affects photographs
      • Understand how ISO affects photographs

*       Raw vs. JPEG

  • Understand the differences between Raw and Jpeg images.
    • Define Raw
    • Define JPEG
  • Determine the strengths and weaknesses of Raw
  • Determine the strengths and weaknesses of Jpeg
  • Understand when each format is appropriate

*      Taking Photographs

  • Determine appropriate techniques to capture pet photos.
  • Determine which settings are appropriate under certain circumstances
    • Aperture
    • Shutter Speed
    • ISO

*      Editing Photographs

  • Determine when to edit photos
  • Define appropriate correction and editing practices
  • Determine the most efficient way to publish/post photos
    • Adjusting RAW Photo levels
    • Dodge/Burn Tool
    • Saving Methods
    • RGB VS. CMYK
    • Image Size/Resolution

*       Christmas Lights Photographs

  • Identify three tips to capture photos
    • Go early
    • Experiment with white balance
    • Embrace your surroundings and create your own perspective
  • Determine the settings to accomplish Christmas Lights Photos